Did you know there are over 3 million PopSockets in circulation? Did you also know that there are also over 3 million people asking How To Remove PopSocket Adhesive? That’s right; everyone wants to know how to get rid of the adhesive.
We all love the PopSockets, but no one likes the sticky residue it leaves behind. Many of us have Googled ways to remove it and found nothing useful.
Well, almost nothing – we read so many ridiculous answers, including putting it in your freezer or washing it with dishwashing liquid and bleach. Don’t try these at home! We found some useful tips, listed below, that will help you remove this adhesive easily.
How To Remove PopSocket Adhesive?
Here are seven different ways you can remove PopSocket adhesive:
Remove PopSocket Sticky Adhesive With Business Card
Utilizing a business card to remove a PopSocket adhesive is a handy and cost-effective method that doesn’t require special tools. The process involves inserting the edge of the business card into the gap between the PopSocket and the phone or case.
Gently wiggle the card back and forth to create a wedge, applying gentle pressure to start loosening the adhesive. As the adhesive loosens, slide the card further underneath the PopSocket.
Maintaining a gentle, steady pace is essential to prevent any possible damage to your device. Once the adhesive bond is adequately loosened, you should be able to remove the PopSocket effortlessly.

Get Rid Of PopSocket Sticky Adhesive With Dental Floss or Fishing Line
Dental floss or fishing line can be highly effective at cutting through the adhesive. Start by securing a decent length of dental floss or fishing line.
Slowly slide one end of it under the edge of the PopSocket. With a steady sawing motion, please continue to work the floss or line underneath the PopSocket, moving around its circumference.
This movement will gradually slice through the adhesive. Be patient and apply consistent, gentle pressure to prevent causing any damage to your device.
After completely working through the adhesive, the PopSocket should peel off without a problem.

Using Heat
Heat can effectively soften adhesives, making them easier to remove. A hairdryer serves well for this purpose. Keep it low to medium to prevent any damage to your phone or case.
Aim the warm air flow at the PopSocket, specifically targeting the adhesive, while keeping a safe distance to avoid overheating your device. The warmth should loosen the adhesive within a few minutes, allowing you to remove the PopSocket.
Make sure not to expose your phone to the heat for an extended period, as it could harm the device’s internal components.
Using Alcohol Wipes
Alcohol, being a potent solvent, can dissolve adhesives. For this method, you need an alcohol wipe or a cloth dipped in rubbing alcohol. Carefully start rubbing the edges of the PopSocket where the adhesive is present.
Ensure you only apply the alcohol to the adhesive to avoid unnecessary contact with your device. The adhesive should start dissolving within a few moments of contact with the alcohol, making it easier to peel off the PopSocket.
Make sure to clean the area thoroughly after removal to avoid any leftover alcohol residue.

Using Double-Sided Tape
Double-sided tape can also be used to lift a PopSocket adhesive. For this, attach a piece of double-sided tape to the surface of the PopSocket, pressing firmly to ensure it adheres well.
Once you’ve secured the tape, begin to pull it off slowly. The pressure should lift off the PopSocket along with the adhesive.
This method is particularly effective when the adhesive is already peeling or losing its strength.
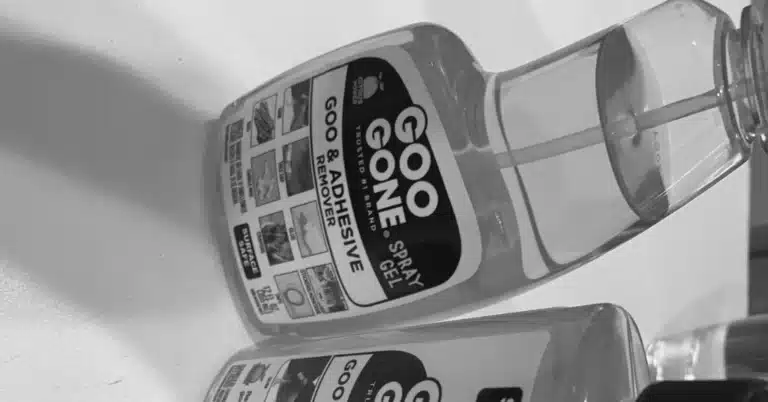
Using Citrus-Based Adhesive Remover
Citrus-based adhesive removers are products specifically designed to dissolve and remove adhesive residues. They can be found in most hardware or home improvement stores.
This method involves applying some of the adhesive removers to the edges of the PopSocket.
Let the remover sit for a few minutes; it should start breaking down the adhesive. Once the adhesive is sufficiently weakened, you can easily remove the PopSocket.

Using Oil
Various types of oil can help dissolve adhesive over time. Cooking, baby, or even coconut oil can serve this purpose. To use this method, apply a small amount of your chosen oil around the edges of the PopSocket and let it sit for a few minutes.
The oil will seep into the adhesive, softening it. After allowing it enough time to work, the adhesive should be loose enough for you to remove the PopSocket with minimal effort.
After each of these methods, ensure you thoroughly clean your phone or case to remove any adhesive or cleaning agent residue. Using a soft, damp cloth to clean the area should suffice. Be gentle during the process to prevent any potential damage to your device.
Does PopSocket leave a sticky residue?
Yes, PopSockets can potentially leave a sticky residue when removed. The residue is from the adhesive that attaches the PopSocket to the device.
However, the amount and stickiness of the residue can vary based on several factors, including the type of surface the PopSocket was attached to, its duration, and the method used to remove it.
If a residue is left behind, it can generally be removed with rubbing alcohol on a cloth or a commercial adhesive remover.
It’s also important to clean the surface thoroughly after the removal to ensure no residue or cleaning agents are left behind.
Ensure to avoid getting liquid into any openings on your device and follow your device manufacturer’s guidance for cleaning.
Does a PopSocket ruin your case?
PopSockets are designed to adhere to most materials but might not stick properly to silicone, highly textured, or waterproof cases. In general, PopSockets should not ruin or damage your phone case, especially if it is a hard, smooth surface.
However, some potential issues may arise:
Adhesive Residue: As previously mentioned, removing a PopSocket can leave behind a sticky residue. This residue can generally be removed without causing damage, but it can be a bit of a hassle.
Discoloration or Texture Change: If a PopSocket is left on a case for a very long time, it may cause some slight discoloration or texture change on certain types of cases due to uneven exposure to environmental conditions. This is more likely with cheaper cases or those with certain types of finishes.
Damage from Incorrect Removal: If a PopSocket is forcefully or incorrectly removed, it could potentially cause damage to the case. It’s best to remove it slowly and carefully, using methods like those described earlier.
Remember, PopSockets are reusable.
If you want to reposition your PopSocket, you can rinse the adhesive gel with water, let it dry, and then reapply it to the case.
This can help to reduce potential damage or residue left on the case. Always follow the manufacturer’s instructions for removing and reapplying your PopSocket.
Can PopSockets be removed easily?
Yes, PopSockets can typically be removed easily. They are designed to be repositionable and reusable. To remove a PopSocket, you simply need to pull up on the base — not the top disc — of the PopSocket. Pull slowly and gently to avoid causing any damage.
However, some factors can influence the ease of PopSocket removal. For instance, if the PopSocket has been attached for a long time, the adhesive might have hardened, making removal a bit more difficult.
Similarly, the type of surface the PopSocket is attached to can also impact the ease of removal.
If you encounter resistance while trying to remove the PopSocket, do not yank or force it off, as this could potentially damage your phone or case. Instead, consider using one of the earlier methods to remove the PopSocket safely.
After removal, if you wish to reuse your PopSocket, you can simply rinse the gel with water, let it dry, and then re-stick it. Always follow the manufacturer’s instructions for best results.
Can you make a PopSocket sticky again?
Yes, you can make a PopSocket adhesive sticky again! If your PopSocket has lost its stickiness, it can be restored easily. Here’s how you can do it:
Cleaning: The first step is to clean the gel on the base of the PopSocket. This can be done by gently rinsing it with water. Over time, dust and dirt can accumulate on the gel, reducing its stickiness, so a good clean can often help restore it.
Drying: Once you’ve rinsed the gel, let it air dry completely. It’s crucial to let it dry naturally and not use any cloth or paper towel to dry it, as this can leave residues that can affect its stickiness.
Reattaching: After completely drying the PopSocket, try reattaching it to your device. Make sure that the surface of your device is also clean and dry.
Remember that the effectiveness of the adhesive can lessen over time and after multiple attachments.
If the above steps do not work and your PopSocket still won’t stick properly, you may need to consider purchasing a new one. Always follow the manufacturer’s instructions for the care and maintenance of your PopSocket to ensure longevity.
Last Opinion
We hope you learned a thing or two about PopSocket adhesive. We also hope you learned how to remove PopSocket adhesive from your phone and other surfaces. So are you ready to get rid of it? There’s no doubt that PopSockets are great for a variety of things.
They can hold your phone upright, protect it from falls, can be used as a tethered stand, and so much more. But did you know that using a PopSocket can also lead to some problems? And by problems, we mean PopSocket sticky adhesive.
The thing is, the adhesive is very strong and hard to get rid of. This sticky substance can easily get on your phone’s surface and the only way to get rid of it is to use a sticky substance to get rid of it.
These methods are best if there is only a small surface area to clean. So what do you say? Are you ready to get rid of the PopSocket sticky adhesive?